Showing posts with label DIY. Show all posts

Saturday, March 30, 2013

Easter! Easter!

I've always wanted to be the kind of person that puts out cute decorations for the not as popular decorating holidays.  But I've never felt like putting my money towards the decorations.  Until I got a little crafty and realized I can get the look without the price.  For example here is a snapshot from my phone of some of my Valentine decorations this year.


I hung up red hearts that I already had from a few years ago and then my girl and I made cupcakes.  So for practically nothing I got that fun festive feeling every time I was in my kitchen.

For Easter I was keeping my eyes peeled for something I could put up.  It took awhile but eventually I came across some great stuff in Targets Dollar section at the front of the store.  I found a cute sequin bunny for $3 as well as some "wooden animal shapes" that came in a pack of 5 for $1.  I bought 3 packs.  So for the grand total of $6 I got my Easter decor.

Here's what I did...


 I already had some twine and the shapes came already "hole punched" with string through them.

 
 So I cut down the string and tied them every few inches onto the twine. 
 When it was all done I had adorable Easter/Spring "garland".  I strung it up on my mantle using some command hooks I already had.  Then I set my bunny up on the mantle and Ta-dah!  My Easter decor...


Thursday, March 8, 2012

It's a Table Runner!

 On of our 3 DIY projects last weekend was a table runner.  A while back I was inspired by this table runner from Z Gallerie.


I loved the idea of a black and white table runner.  I thought it would add some nice dimension to my lacking dining space.  I wanted a table runner with a black center and a black and white patterned border.  So I went on the hunt for a tutorial.  I came up with this tutorial.  Only I didn't want a pointed end and I certainly didn't want to turn it into a gift bag!  LOL!

So here's what we did....

I decided I wanted the center to be 8.5" wide and the borders to be 3.5" wide.  When allowing for 1/2" seams the center black fabric needed to be 9.5" and the borders needed to each be 4" wide.  However, the patterned fabric wraps around the back of the runner so I needed to add another 15.5" (which is what the ending width of the runner comes out to be (adding 8.5+3.5+3.5)).  Here is a sketch we did when figuring this all out.
When all said and done, the patterned fabric was  23.5" (4+4+15.5).
At this point we just placed the fabric right sides together and sewed the 2 seams. 
(Let me stop to tell you now, you can make the length whatever you need.  In my case, my table is 60.5" long but it also has a 18" wide leaf that I put in as needed.  So I found a good balance of adding extra length so the runner would be close to the edge when the leaf was in but not too long that it hangs down really far when the leaf was out.  I added 7" on each side.  So that totaled 74.5" then I allowed for a 1" seam on each side. Therefore I cut my fabric to 76.5")

This made a long tube.  We pressed the seams with an iron and then turned the fabric right sides out.  Then we measured down the length of the runner to make sure the border was even on both sides and we ironed the edges to make a good crease.


For the ends...  they were folded in twice and then a seam was sewn across.


I've never typed up a tutorial, so if that was confusing or you have questions, please leave a comment!

Here is the finished product!  I was SO pleased with it!

But of course it was missing one thing... flowers in the vase!  Well, Michaels was having a 40% off sale on their flowers.. Perfect!  Here's the arrangement I put together.


Here's the final outcome...


And the reverse side!


Closeups...


I'm so proud of us!

Thursday, January 26, 2012

Bye Bye Oak...

..you wont be missed.
 Listing


 Progress

Today

I'm so happy with how it turned out!  Of course now I want to change the wall color.  Which I was planning to do anyway but now I really want to!  
Here's what I did...

First off there was an ugly wing decal on the front.  I took that off but it left splintered wood and little nails that wouldnt come out.  I used a nail punch to push the nails under the surface of the fireplace and then I filled the holes with wood filler.  Then I sanded it all down to make it smooth and level.  

That was the only area I sanded though.  The rest of it I left be, I didn't sand or use a deglosser I just got a good primer and primed the whole fireplace.


I then left it dry for a few hours and put on the first coat of paint.

I then let it dry all night.  The next morning it was on to the second coat of paint.  After that it looked pretty good but I felt like I could see a few areas that might need a little more coverage.  So I waited the recommended 4 hours and put on a third coat.

And again, here it how it turned out...

We also painted some of our baseboards.  The builders had an icky flat paint on there and lots of nail holes that were never even filled.  So we filled the holes and painted the baseboards with a nice bright white semi-gloss paint.


Hard to capture the before and after but here was my attempt...
Before
 After

 And just for fun here is an "in the midst of the chaos" shot...


Tuesday, November 15, 2011

Paint Makes Ugly Things Pretty

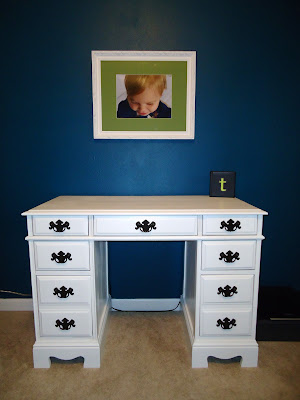
FINALLY!  I'm finally writing you from the desk in my office.  That's right my desk is done! I still plan to get a piece of glass to set on top of it but all of the painting is done.  Ready for the before and after?

Here is the hideous craigslist posting picture of the desk.

It was dirrrty, beat up.  It had white out all over it as you can see.
So I cleaned it, sanded it, primed it and painted it white.  And I spray painted the handles hammered black.  And here's the desk now!


I'm extremely happy with how it turned out.  I also love the framed pic I put above it.  Its from pics we got done at Penneys a couple weeks ago and the frame and matte I got at Hobby Lobby yesterday.

Now I have my bookshelves to put up and the office will be as done as it's going to get right now.  Until I pick out artwork, a rug, a new computer chair and other accessories.