Every Spring I wonder where my yard went. And then I trim my terribly placed willow tree and find it all over again!
Here it is half way through trimming.
And done.
Showing posts with label Before and After. Show all posts
Showing posts with label Before and After. Show all posts
Wednesday, May 29, 2013
Wednesday, May 8, 2013
The new addition
As mentioned in my last post. There is a new addition in my living room. I guess you'd actually call it a replacement since there was already one there. But it is... another new fan! Check it out...
Here is a reminder of what we had before.
I don't know that I have a close up to share. But this was your basic builders grade fan. Unfortunately with the added details of some kind of speckled paint job. But anyway, isn't the new one so pretty!? It's another one designed by my sis in law, made by Emerson. It's called the
Highpointe. I've taken some full room shots that I'll try to post soon too.
Next up. THE BACKYARD! We've been working on it as the weathers been warming up and we are making some fun changes (especially this weekend)! It will finally have a more "finished" look. Can't wait!!
Thursday, March 21, 2013
A little better
Well our guest room ended up having some changes made to it.
When I first designed Raeleigh's bedroom (in my head) I had decided to use her existing espresso colored dresser. So I got a small dresser/nightstand to match. However, when it got closer to time to redo Raeleigh's room I made the switch and decided she needed a white dresser. I just wanted her room to be very light and airy feeling and the dark furniture just wasn't going to do.
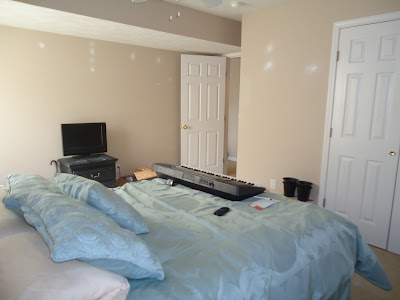
So then I ended up with extra furniture. A good problem to have especially when that very furniture was needed in our guest room. Well on top of a new dresser and a new nightstand we also got a new headboard.... for free. Because it's actually just a part of Raeleigh's crib. It was a convertible crib so although it's meant to use for a full sized bed and the guest bed is a queen, it still works. Oh and I also found a white bed skirt in my attic to use.
So here's where the guest room was before the recent additions.
And here it is now.
(join me as I pretend you dont notice the finger smudges in this pic)
And just for fun let's compare the bedroom from where it was right after we moved in to now.
Monday, March 18, 2013
My recent project is...
My new TV wall! I never liked my TV wall before. I just kind of
threw something up there to fill the space. I never even took a close
up of it for this blog... not that I can remember anyway. Heres the
best I found:
But that wall (in my mind anyway) has always called for something more substantial. And well.... until we can afford a huge faux built-in entertainment center, I needed something to keep me happy in the mean time. I had always been inspired by this picture on Pinterest:
Que, a visit to Target. I found several frames that were being clearanced out. I bought them all. However it wasn't enough. Thankfully my Mom lives near several Targets and found the rest I needed and even cheaper than my clearance price! So my project ended up being half the price I thought I'd end up spending.
I thought about explaining how I did the measuring but I wont get into all that. If you want to copy the look I just suggest drawing it out on paper because that helped a lot. So here is the finished product! I haven't yet put in our pictures but I plan to make them all black and white.
You'll also see in this picture the new curtains I wrote about quite awhile ago.... also from Target. (Yes I love Target)
I'd like to add a chair or maybe 2 chairs flanking the tv. maybe with a floor lamp just to kind of break up things a bit and fill those spaces. But for now I'm at least much happier than I was before!
Tuesday, February 12, 2013
Without Further Adieu...
Raeleigh's big girl room!
But how did we get here? Let's look back. When we first moved into this house (May 2011) I just made everything look like it did in her room at our last house. Same wall color, furnishings, etc... The downside of that was that this is a much bigger room than her last one so it never looked right, it just looked like big space with stuff around the perimeter.
A perfectly good room but it never thrilled me. I was always looking forward to the eventual big switch-over to the big girl room. I was inspired by a few different rooms on Pinterest but one above all was "London's Big Girl Room" which you can see HERE. I don't remember exactly when I first saw it but I think it was in March or April 2012. It was exactly what I had pictured for Raeleigh's room and I was so happy to have a direction to work toward. From that point on I was ready to start slowly collecting things for her new room. It started in May when I saw these great fabric letters at Silver Dollar City.
At $5 a letter, it was a little pricier than I had hoped (especially when your daughter has a long name) but for the impact I knew it'd have, I decided it was worth it. I think the next things I bought were on our vacation to California in August. I got her duvet cover, curtains, a frame and lap desk at Ikea. (SO happy there's one finally coming to Missouri!) After that I just hit up places like Hobby Lobby, Target and Ross'. Around the beginning of November I decided I needed to wait until after the holidays to do her room. So then the last week of January it was!
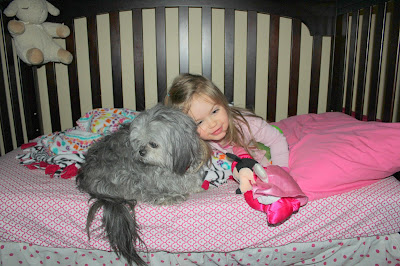
The weekend was just about here and then I realized as all moms tend to do..... this is the last of something... her last night in her first bed. It was her crib that turned into a toddler bed where aside from the first 3 (colic filled) months of her life, we had put her to bed. So I busted out the camera to put my heart at ease.
And that was about it for the first day. The next day I had Jake at home with me. We primed over those awful blue dots and painted the ceiling.
But how did we get here? Let's look back. When we first moved into this house (May 2011) I just made everything look like it did in her room at our last house. Same wall color, furnishings, etc... The downside of that was that this is a much bigger room than her last one so it never looked right, it just looked like big space with stuff around the perimeter.
A perfectly good room but it never thrilled me. I was always looking forward to the eventual big switch-over to the big girl room. I was inspired by a few different rooms on Pinterest but one above all was "London's Big Girl Room" which you can see HERE. I don't remember exactly when I first saw it but I think it was in March or April 2012. It was exactly what I had pictured for Raeleigh's room and I was so happy to have a direction to work toward. From that point on I was ready to start slowly collecting things for her new room. It started in May when I saw these great fabric letters at Silver Dollar City.
At $5 a letter, it was a little pricier than I had hoped (especially when your daughter has a long name) but for the impact I knew it'd have, I decided it was worth it. I think the next things I bought were on our vacation to California in August. I got her duvet cover, curtains, a frame and lap desk at Ikea. (SO happy there's one finally coming to Missouri!) After that I just hit up places like Hobby Lobby, Target and Ross'. Around the beginning of November I decided I needed to wait until after the holidays to do her room. So then the last week of January it was!
The weekend was just about here and then I realized as all moms tend to do..... this is the last of something... her last night in her first bed. It was her crib that turned into a toddler bed where aside from the first 3 (colic filled) months of her life, we had put her to bed. So I busted out the camera to put my heart at ease.
Also, Roxie's not allowed in Raeleigh's room but I guess she sensed something was going on because when we turned around, we saw this...
So with that sad face of course we had to let her in!
The next morning I got up early and drove Raeleigh 2 hours to meet my mom in a city between me and her. I handed my little miss over (which is always so stinkin' hard to do) and I drove right back home. I stopped off at Lowes first and picked up my paint (I had decided on Valspar's Sea Breath).
The first day I pulled everything out of her room, every last little thing.
(Note the dirt marks on the wall that look like crib slats.) =)
The last thing I left up was her name on the wall. It was so hard to take down. We had another one at the last house that I had carefully taken the "R" off of and framed. Again to put my heart at ease I took the "R" off of this one too. Only this time i just stuck inside the back of the frame of the first, just so I had it (If that makes sense?). Also, I needed to FINALLY take down the awful stars the first owner had left up.
Something we had put off doing because when we took them down it looked like this.
Blue tacky stains all over the ceiling.
Next I started in on priming and painting the ceiling in the closet, then it was on to priming and painting the shelf in there too.
Having never painted a ceiling I was SOO happy with the results! Then we painted the white wall that would become the striped wall. Got a picture of my helper in action.
He's great at "bulk" painting, I do the edging. Which let me say this was the first I ever strictly "cut in" without taping. I prefer it so much more and you get a much better result. So the only thing I did tape was the stripes. And that was the last thing I did that night.
The next day was our last full day and it was the fun one! First thing we did was get the pretty blue on the walls.
And I was so happy! It was just the color I had imagined her room to be!
Then the really fun stuff! Getting to put all the new stuff in!
The headboard I bought off craigslist for $25 and painted yellow. The bed frame and mattress were from Sams and I'm so happy with them! This kind of bed frame doesn't need box springs so that leaves extra room for storage underneath! And the mattress is so comfortable! Actually I'd say it's more comfortable than ours that was 4 times the price of hers. :/
Ok and after all my blabbering, here's the final result!
And in the end, what mattered most? ..........it was Raeleigh approved!!
There are some minor things left to do, but there it is! Hope you enjoyed!
Linked up at:
Subscribe to:
Posts (Atom)


